Testing & Validation
This section covers important tests to validate the operation of the API.
Introduction
It is important to test our code. If you are a contributor, please follow the guidance on this page.
Developers Using Microsoft Windows
All our workflows use Linux based commands, therefore if you are a developer who codes in Microsoft Windows then we strongly suggest that you use the Windows Subsystem for Linux (WSL) as your command line interface (CLI).
The test/ Directory
The test/ directory contains the code for performing API tests against Talawa API. The tests in this directory and its various subdirectories must follow the practices of black box testing and most of them should be written to be able to run concurrently. The test/install_scripts/ subdirectory contains shell installation script tests, which mirror the layout of scripts/install/.
- Tests for files in the
src/directory must only be placed in the equivalent subdirectory under thetest/directory. - TypeScript test files must have a
.test.tsextension. - Changes to
scripts/install/must include or update tests intest/install_scripts/(e.g.*.test.shin the same relative path).
The rest of this page will assist you in being an active contributor to the code base.
Quick Start
Running Tests
Run all tests:
pnpm run check_tests
Run specific test file:
pnpm run check_tests -- /path/to/test/file
Run with coverage:
pnpm run run_tests
Run with test sharding:
pnpm run test:shard
Run install script tests (shell):
pnpm test:install
Linting and Formatting
Fix linting & formatting issues:
pnpm run format:fix
Check linting & formatting:
pnpm run format:check
Check for sanitization issues:
pnpm run lint:sanitization
Check TSDoc comments:
pnpm run lint:tsdoc
Type Checking
Run TypeScript type checker:
pnpm run typecheck
Error Handling Validation
Check for error handling violations:
pnpm run validate:error-handling
Attempt to auto-fix violations:
pnpm run validate:error-handling:fix
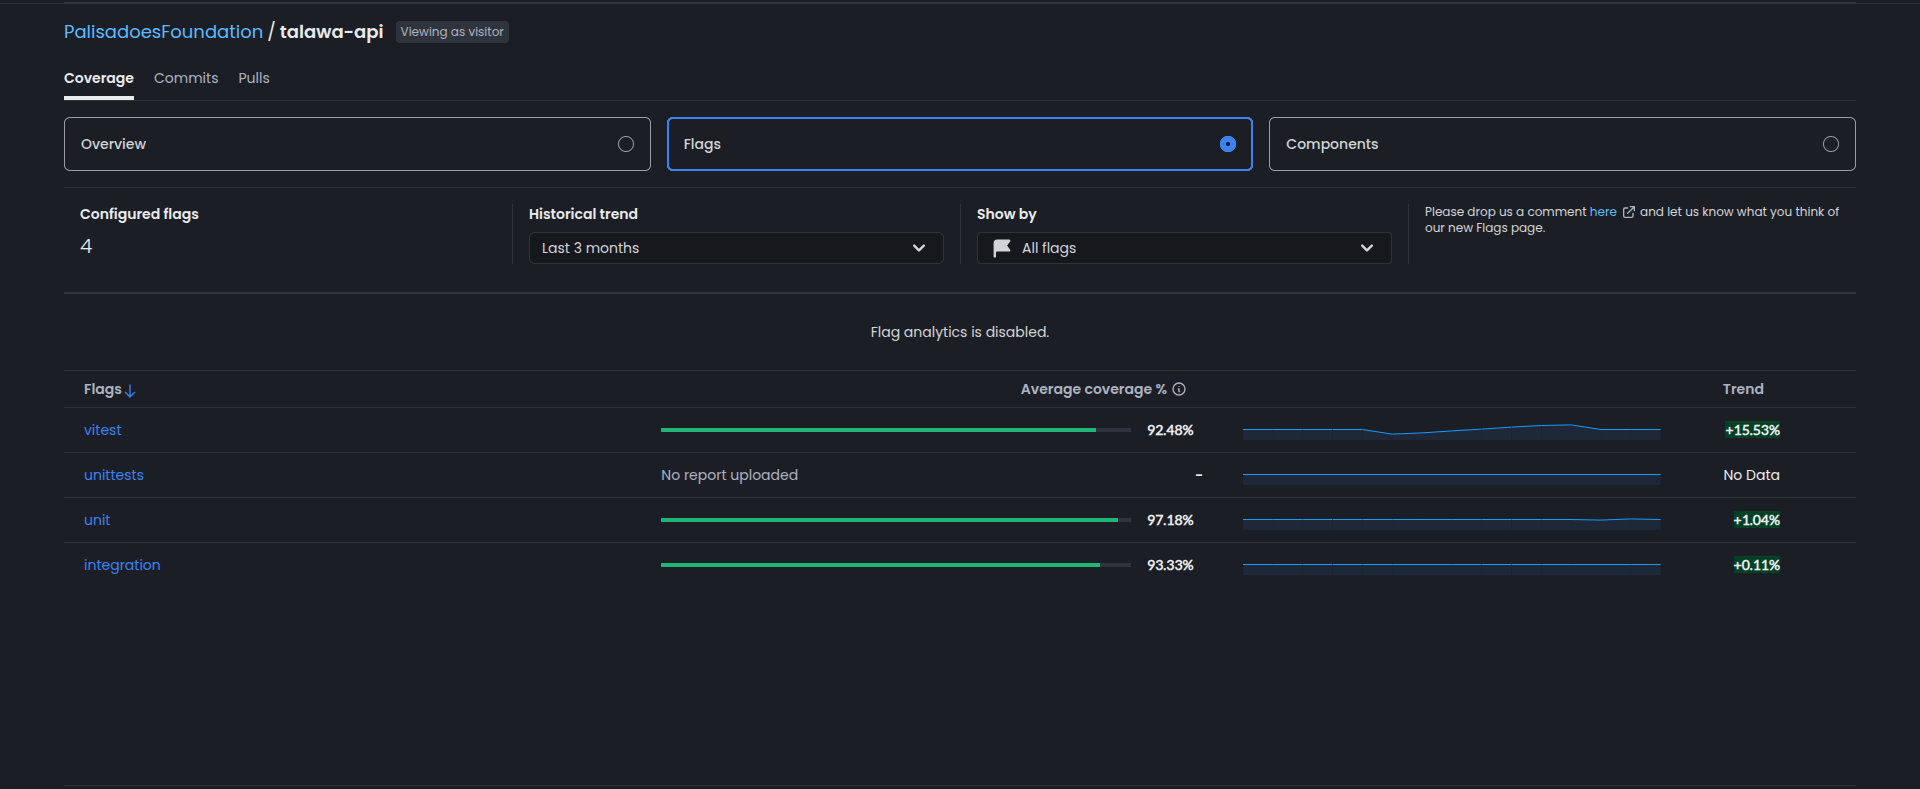
Code Coverage Flags
We use Codecov flags to separate and track coverage metrics for different types of tests:
Unit Flag
The unit flag tracks coverage for:
test/unit/: Unit tests for isolated logicsrc/utilities/: Utility functionssrc/services/: Service layer code
Integration Flag
The integration flag tracks coverage for:
test/drizzle/: Database integration teststest/graphql/: GraphQL API integration teststest/install/: Installation and setup tests (TypeScript)
The install flag (when coverage is uploaded) tracks coverage for:
scripts/install/: Shell installation scripts; tests live undertest/install_scripts/.
These flags allow us to monitor coverage separately on the Codecov dashboard, helping identify gaps in either unit or integration test coverage.
Codecov Flag Meanings (Dashboard)
The Codecov dashboard may show four flags. Only two are actively produced by our current CI workflows. The other two are legacy flags that may still appear if they were uploaded in the past.
| Flag | What it represents | Status in this repo |
|---|---|---|
unit | Coverage uploaded from vitest.unit.config.ts (unit test suite). | Active |
integration | Coverage uploaded from vitest.integration.config.ts (integration test suite). | Active |
vitest | A combined Vitest coverage report from older workflows (pre-split) or ad-hoc uploads. | Legacy (not currently uploaded) |
unittests | An older/renamed flag that no longer receives uploads. | Legacy (no report uploaded) |
Notes:
- The active flags are
unitandintegration. These are the only flags uploaded by CI today. - Legacy flags can remain visible on the dashboard even if they are not being uploaded anymore. If you see “No report uploaded,” it’s a stale flag.
- Admins can delete stale flags from the Codecov UI if needed.
Linting & Static Analysis
We use Biome for linting and formatting. In addition to standard rules, we have custom plugins enabled to enforce security best practices.
Biome Plugins
We have a custom GritQL plugin enabled to detect potential security issues.
require_escapeHTML
This plugin is designed to enhance security by detecting potential Cross-Site Scripting (XSS) vulnerabilities in Pothos GraphQL resolvers. It checks if t.string fields with a resolve function are using the escapeHTML utility.
This feature is active and will impact testing results. If your code triggers this warning, you must address it either by sanitizing the output or by explicitly suppressing the warning if it is a false positive.
Why is this important?
When returning user-generated content (like bios, descriptions, comments) in a GraphQL API, it is crucial to sanitize the output to prevent malicious scripts from being executed in the client's browser. The escapeHTML function performs this sanitization.
What it detects
The plugin looks for t.string(...) definitions that:
- Have a
resolveproperty. - Do not contain a call to
escapeHTML(...)within the resolver.
Example that triggers a warning:
t.string({
  resolve: (parent) => parent.bio, // Warning: Missing escapeHTML
});
Example that passes:
import { escapeHTML } from "~/src/utilities/sanitizer";

t.string({
  resolve: (parent) => escapeHTML(parent.bio), // Safe
});
False Positives & Limitations
This pattern is a heuristic and may flag safe code:
- Safe Strings: IDs, Enums, numbers converted to strings, or hardcoded strings do not need sanitization but will still be flagged if they are in a
t.stringresolver. - External Sanitization: If you sanitize the string before the resolver or in a separate function call that isn't named
escapeHTML, the plugin will not detect it.const safeBio = escapeHTML(user.bio);t.string({ resolve: () => safeBio }); // Warning: Plugin only sees the resolver body - Pattern Scope: It currently only matches
t.string(...). It does not catcht.field({ type: 'String', ... }).
How to Suppress
If you are certain a field is safe (e.g., it returns a database ID), you can suppress the warning.
Since this is a custom GritQL plugin, standard biome-ignore comments might not work depending on the Biome version and integration.
If biome-ignore does not work, you can exclude specific files in biome.jsonc or refactor the code to make the safety explicit (e.g., using a helper function that includes escapeHTML in its name, or just adding a comment explaining why it's safe if the warning is non-blocking).
Error Handling Validation
We enforce consistent error handling practices across the codebase through automated validation. This prevents regressions and ensures standardized error codes and patterns.
Purpose
The validation script enforces:
- Use of
TalawaRestError(REST routes) andTalawaGraphQLError(GraphQL resolvers) instead of genericError - Proper error code usage via the
ErrorCodeenum - Structured logging in critical paths (routes, resolvers, workers)
- Non-empty catch blocks with proper error handling
- Detection of legacy error patterns
Running Validation
Check for error handling violations:
pnpm run validate:error-handling
Attempt to auto-fix violations:
pnpm run validate:error-handling:fix
CI/CD and Git Hooks
- CI/CD: This validation runs automatically on every Pull Request via GitHub Actions. The build will fail if violations are detected.
- Pre-commit Hook: A pre-commit hook is configured via Lefthook to run validation before you commit, catching issues early.
- Scope: The validator only scans modified files (not the entire codebase).
Testing Philosophy
Black box testing in this context means we test Talawa API from the perspective of a client making requests to it. This also means that we must only communicate with Talawa API during the tests with its publicly exposed interface.
In the context of the rest api interfaces exposed by Talawa API it means making standard HTTP calls using methods like GET, POST, PATCH, PUT, DELETE etc., and asserting against the HTTP responses.
In the context of the graphql api interfaces exposed by Talawa API it means triggering standard graphql query, mutation and subscription operations against the graphql api endpoint(over HTTP POST method for our use case) and asserting against the graphql responses.
Unit Tests vs Integration Testing
The current codebase has the simplest implementation for graphql which is doing everything within resolvers. It is good for now because it lets the project move fast, break things and quickly iterate on changes. When a stable api is reached, then the project can be architected into something that is more suited to unit tests.
We started implementing integration tests because for the current requirements the best kind of testing is to ensure that the graphql operations return what they are expected to return when talawa clients make those operations.
The GraphQL schema cannot be tested without running the graphql server itself because it is an internal implementation detail of the graphql engine. The old approach, when the API used a MongoDB backend, only tested the resolvers which does not account for this.
The end users will be interacting with the graphql schema and not the typescript graphql resolvers. So, the tests should be written in a way that asserts against the runtime behavior of that graphql schema.
Integration Testing
Based on this design, we only do integration testing for GraphQL queries and mutations in these folders.
src/graphql/types/Mutationsrc/graphql/types/Query
NOTE: No unit testing is done in these folders.
Unit Testing
We only do unit testing the return type of the Graphql types resolver in these folders.
src/graphql/types/*
NOTE: No integration testing is done in these folders.
Directory Structure
The test/server.ts file exports the Talawa API server instance that can be imported and used in different api tests. This Talawa API server instance is shared between api tests.
There aren't any other strict structure requirements for the this directory.
Mock GraphQL Context Factory Function
In Directory test/_Mocks_/mockContextCreator
Purpose
The createMockGraphQLContext function provides a fully mocked GraphQL context for unit and integration testing of GraphQL resolvers. It ensures that resolvers can be tested without needing a real database, MinIO storage, or authentication service and works as a centralized mocking mechanism.
Usage
Importing the Mock Context
import { createMockGraphQLContext } from "test/_Mocks_/mockContextCreator";
Creating a Mock Context
For an Unauthenticated User
const { context, mocks } = createMockGraphQLContext({
  isAuthenticated: false,
});
context.currentClient.isAuthenticated will be false.
For an Authenticated User
const { context, mocks } = createMockGraphQLContext({
  isAuthenticated: true,
  userId: "user123",
});
context.currentClient.user.id will be "user123".
Components in Mock Context
The mock context provides the following:
| Component | Description |
|---|---|
currentClient | Simulates authenticated/unauthenticated users. |
drizzleClient | Mocked database client (createMockDrizzleClient). |
envConfig | Mocked environment variables (API_BASE_URL). |
jwt.sign | Mocked JWT generator (vi.fn() returning a test token). |
log | Mocked logger (createMockLogger). |
minio | Mocked MinIO client for object storage (createMockMinioClient). |
pubsub | Mocked pub-sub system for GraphQL subscriptions (createMockPubSub). |
Return Value
The function returns an object with two properties:
| Property | Description |
|---|---|
context | The complete mocked GraphQL context to pass to resolvers |
mocks | Direct access to individual mock instances for setting expectations |
How Contributors Should Use It
Follow these steps:
Unit Testing Resolvers (With exposed mocks for verification)
test("should return user data", async () => {
  // Create context with mocks
  const { context, mocks } = createMockGraphQLContext({
    isAuthenticated: true,
    userId: "user123",
  });

  // Configure mock behavior if needed
  mocks.drizzleClient.query.mockResolvedValue([
    { id: "user123", name: "Test User" },
  ]);

  // Call your resolver
  const result = await userResolver({}, {}, context);

  // Verify results
  expect(result.id).toBe("user123");

  // Verify interactions with dependencies
  expect(mocks.drizzleClient.query).toHaveBeenCalledWith(
    expect.stringContaining("SELECT"),
    expect.arrayContaining(["user123"]),
  );
});
Key Benefits
- Exposed Mocks – Direct access to mock instances for setting expectations and verifying calls.
- Type Safety – Proper TypeScript typing for all mocked components.
- Scalable – Any future changes in
GraphQLContextcan be updated in one place, ensuring a single source of truth.
Simplified Call Signature
The function supports both simple and object-based parameter styles:
// Legacy style (still supported)
const { context, mocks } = createMockGraphQLContext(true, "user123");

// New object-based style (recommended)
const { context, mocks } = createMockGraphQLContext({
  isAuthenticated: true,
  userId: "user123",
});
GraphQL Resolver Type Safety Guidelines
Best Practices
- Use Schema-Generated Types Only
- Derive types from
context.tsand GraphQL schema. Avoid custom types.
- Stick to
GraphQLContext
- All resolvers must use
GraphQLContextfromcontext.ts.
- Leverage Drizzle ORM Types
- Use
typeof table.$inferSelectfor entity types. Never define manually.
- Only detach if needed for mock testing and ensure it follows correct typeSafety
Correct Example
import { eq } from "drizzle-orm";
import { eventsTable } from "~/src/drizzle/tables/events";
import type { GraphQLContext } from "../../context";
type EventsTable = typeof eventsTable.$inferSelect;
export const resolver = async (
  parent: EventsTable,
  _args: Record<string, never>,
  ctx: GraphQLContext,
) => {
  if (!ctx.currentClient.isAuthenticated)
    throw new Error("Authentication required");
  return ctx.drizzleClient.query.usersTable.findFirst({
    where: eq(ctx.usersTable.id, parent.updaterId),
  });
};
Incorrect Example
import type { CustomContextType } from "../../customContext"; //  Custom context
import type { EventType } from "../../types/Event"; //  Manual type
export const resolver = async (
  parent: EventType, //  Avoid this
  _args: Record<string, never>,
  ctx: CustomContextType, //  Avoid this
) => {
  /* Inconsistent and error-prone */
};
Key Rules
- Always use
GraphQLContextfromcontext.ts. - Use
typeof table.$inferSelectfor Drizzle entities. - Never define custom types for resolvers.
This ensures type safety and consistency across your GraphQL resolvers.
Future Considerations
In the future, there might be a requirement to run some tests sequentially. When that moment arrives, separating sequential and parallel tests into separate directories and using separate Vitest configuration for them would be the best idea.
Writing Reliable Concurrent Tests
Here are the guidelines for writing non-flaky tests that are able to run concurrently or in parallel:
-
All tests must set up their own data to get the application to their desired state. Tests must not assume that the data they need to act on can be dervied from other tests or could pre-exist.
-
All tests must perform write operations only on data associated to them. Tests must not in any way perform write operations on data that isn't associated to them because it could lead to disruption of other tests. The best way to ensure this is to introduce uniqueness to the data created within tests through the usage of cryptographic identifier generators like uuid, cuid, nanoid etc.
-
All tests must either assert against data associated to them or they must change their assertion logic to something that suits asserting against random data.
Example test suites 1 and 2 depicting the violations and followage of these guidelines:
Guideline Violation Example
This example show a violation of the guidelines.
// Test suite 1
suite.concurrent("flaky concurrent tests", async () => {
  test.concurrent("create user test", async () => {
    const userData = {
      id: "1",
      name: "user1",
    };
    const createdUsers = await fetch.post("/users", {
      body: [userData],
    });
    expect(createdUsers[0]).toEqual(userData);
  });

  test.concurrent("get user test", async () => {
    const user = await fetch.get("/users/1");
    expect(user).toEqual({
      id: "1",
      name: "user1",
    });
  });

  test.concurrent("update user test", async () => {
    const updatedUser = await fetch.update("/user/1", {
      body: {
        name: "updatedUser1",
      },
    });
    expect(updatedUser).toEqual({
      id: "1",
      name: "updatedUser1",
    });
  });

  test.concurrent("delete user test", async () => {
    const deletedUser = await fetch.delete("/user/1");
    expect(deletedUser).toEqual({
      id: "1",
      name: "user1",
    });
  });

  test.concurrent("get users test", async () => {
    await fetch.post("/users", {
      body: [
        {
          id: "2",
          name: "user2",
        },
        {
          id: "3",
          name: "user3",
        },
        {
          id: "4",
          name: "user4",
        },
      ],
    });
    const users = await fetch.get("/users");
    expect(users).toHaveLength(3);
  });
});
Guideline Compliance Example
This example shows compliance with the guidelines.
// Test suite 2
suite.concurrent("non-flaky concurrent tests", async () => {
  test.concurrent("create user test", async () => {
    const userData = {
      id: randomIdGenerator(),
      name: `name${randomIdGenerator()}`,
    };
    const createdUsers = await fetch.post("/users", {
      body: [userData],
    });
    expect(createdUsers[0]).toEqual(userData);
  });

  test.concurrent("get user test", async () => {
    const userData = {
      id: randomIdGenerator(),
      name: `name${randomIdGenerator()}`,
    };
    await fetch.post("/users", {
      body: [userData],
    });
    const user = await fetch.get(`/users/${userData.id}`);
    expect(user).toEqual(userData);
  });

  test.concurrent("update user test", async () => {
    const userData = {
      id: randomIdGenerator(),
      name: `name${randomIdGenerator()}`,
    };
    await fetch.post("/users", {
      body: [userData],
    });
    const newName = `newName${randomIdGenerator()}`;
    const updatedUser = await fetch.update(`/users/${userData.id}`, {
      body: {
        name: newName,
      },
    });
    expect(updatedUser).toEqual({
      id: userData.id,
      name: newName,
    });
  });

  test.concurrent("delete user test", async () => {
    const userData = {
      id: randomIdGenerator(),
      name: `name${randomIdGenerator()}`,
    };
    await fetch.post("/users", {
      body: [userData],
    });
    const deletedUser = await fetch.delete(`/users/${userData.id}`);
    expect(deletedUser).toEqual(userData);
  });

  test.concurrent("get users test", async () => {
    const userDataList = [
      {
        id: randomIdGenerator(),
        name: `name${randomIdGenerator()}`,
      },
      {
        id: randomIdGenerator(),
        name: `name${randomIdGenerator()}`,
      },
      {
        id: randomIdGenerator(),
        name: `name${randomIdGenerator()}`,
      },
    ];
    await fetch.post("/users", {
      body: userDataList,
    });
    const users = await fetch.get("/users");
    expect(users).length.greaterThanOrEqual(3);
  });
});
Test DB Usage
Here is some important information about how the test DB is used both for your tests and the CI/CD pipeline.
- The
postgres-testdatabase is strictly meant for testing in all environments. The environment variable value ofAPI_POSTGRES_HOSTis overwritten frompostgrestopostgres-testin all environments where tests are run as shown in/test/server.ts. - The
postgresservice is not enabled in the CI environment as can be seen in theCOMPOSE_PROFILESenvironment variable inenvFiles/.env.ci. Only thepostgres_testservice is enabled in the CI environment. - We use two database containers for
postgresandpostgres_test, not two databases in a single container because the latter goes against the philosophy of containerization. - The
test/folder has an environment variables schema defined intest/envConfigSchema.ts. To accessAPI_POSTGRES_TEST_HOSTyou just pass the schema toenv-schema. - We don't use
postgres_testin the.env.cifile because the CI/CD pipeline isn't limited to testing. We did this to be future proof.
Environment Variables
If you need to overwrite the environment variables, you have to allow passing those environment variables as arguments as in the createServer function in the src/createServer.ts file. This is how API_POSTGRES_HOST and API_MINIO_END_POINT are overwritten in the tests as explained previously.
Sample DB Login Credentials
If the API:
- is running with an unmodified
.envfile copied fromenvFiles/.env.devcontainerand; - the API sample database is loaded; then you can use these login credentials to access the API via various clients.
| Password | User Type | Joined Organization | |
|---|---|---|---|
| administrator@email.com | password | Administrator | N/A |
| testsuperadmin@example.com | Pass@123 | Administrator | N/A |
| testadmin1@example.com | Pass@123 | Administrator | N/A |
| testadmin2@example.com | Pass@123 | Administrator | N/A |
| testadmin3@example.com | Pass@123 | Administrator | N/A |
| testuser1@example.com | Pass@123 | Regular | N/A |
| testuser2@example.com | Pass@123 | Regular | N/A |
| testuser3@example.com | Pass@123 | Regular | N/A |
| testuser4@example.com | Pass@123 | Regular | N/A |
| testuser5@example.com | Pass@123 | Regular | N/A |
| testuser6@example.com | Pass@123 | Regular | N/A |
| testuser7@example.com | Pass@123 | Regular | N/A |
| testuser8@example.com | Pass@123 | Regular | N/A |
| testuser9@example.com | Pass@123 | Regular | N/A |
| testuser10@example.com | Pass@123 | Regular | N/A |
| testuser11@example.com | Pass@123 | Regular | N/A |
Accessing the API
These are some important URLs for coding and troubleshooting:
Validation
-
By default talawa-api runs on port 4000. It is available on the following endpoint:
http://127.0.0.1:4000- If you navigate to the endpoint you and see a JSON response like this.
{"message": "Route GET:/ not found","error": "Not Found","statusCode": 404}
GraphQL
This section covers how to access the GraphQL API interface.
Interactive Web Queries With GraphiQL
You can use GraphiQL to test your GraphQL queries interactively via a web page.
The url for accessing the GraphQL Playground is:
http://127.0.0.1:4000/graphiql
Programmatic Queries With GraphQL
The graphQL endpoint for handling queries and mutations is this:
http://127.0.0.1:4000/graphql
- This is the Organization URL to be used for:
- The Talawa Mobile app
- The Talawa Admin app
- If you navigate to the endpoint you and see a JSON response like this.
{ "data": null, "errors": [{ "message": "Unknown query" }] }
Subscriptions with GraphQL
The GraphQL endpoint for handling subscriptions is:
ws://127.0.0.1:4000/graphql
Accessing the API in Talawa App Using Remote Access
-
Launch the terminal application on your device.
-
Retrieve IPv4 Address:
- For Windows Users: Enter the command
ipconfig. - For Linux/OSX Users: Enter the command
ifconfig. - Copy the
IPv4 Addressdisplayed (e.g.,192.168.12.233).
- For Windows Users: Enter the command
-
Make sure both your mobile and your computer are connected to the same network.
-
Use the following format for your endpoint:
http://<IPv4 address>:4000/graphql
Replace <IPv4 Address> with the actual IP address you copied in step 2.
Note: In the Talawa app, type the endpoint URL in the field labeled Enter Community URL.
Interactive Testing
Use the API_BASE_URL URL configured in the .env file. As the endpoint uses GraphQL, the complete URL will be API_BASE_URL/graphql
Using Curl
This section shows how to do some basic transactions using CURL
Sign-in
This endpoint is used to sign in a user.
Request:
curl -X POST -H "Content-Type: application/json" -k <API_BASE_URL>/graphql -d '{
  "query": "query signIn($input: QuerySignInInput!) { signIn(input: $input) { authenticationToken user { emailAddress id name } } }",
  "variables": {
    "input": {
      "emailAddress": "administrator@email.com",
      "password": "password"
    }
  }
}'
Request Headers:
Content-Type: application/json
Request Body:
{
  "query": "query signIn($input: QuerySignInInput!) { signIn(input: $input) { authenticationToken user { emailAddress id name } } }",
  "variables": {
    "input": {
      "emailAddress": "administrator@email.com",
      "password": "password"
    }
  }
}
Response:
- Returns the authentication token and user details (email address, id, and name).
Organization Creation
This endpoint is used to create a new organization.
Request:
curl -X POST -H "Content-Type: application/json" -H "Authorization: Bearer <your_token>" -k  <API_BASE_URL>/graphql -d '{
  "query": "mutation Mutation_createOrganization($input: MutationCreateOrganizationInput!) { createOrganization(input: $input) { id name } }",
  "variables": {
    "input": {
      "name": "name0"
    }
  }
}'
Request Headers:
Content-Type: application/jsonAuthorization: Bearer <your_token>
Request Body:
{
  "query": "mutation Mutation_createOrganization($input: MutationCreateOrganizationInput!) { createOrganization(input: $input) { id name } }",
  "variables": {
    "input": {
      "name": "name0"
    }
  }
}
Response:
- Returns the newly created organization's ID and name.
Using GraphiQL
Here are some basic commands you can use for testing
Signing in as Administrator
Use the following GraphQL query to get an authentication token for authorization in later queries:
query {
  signIn(
    input: { emailAddress: "administrator@email.com", password: "password" }
  ) {
    authenticationToken
    user {
      id
      name
    }
  }
}
Example Response:
{
  "data": {
    "signIn": {
      "authenticationToken": "YWQ2LWE2OTctMjZjYmFlYjEyYTI1In0sImlhdCI6MTceyJhbGciOiJIUzI1NiIsInR5cCI6IkpXVCJ9.eyJ1c2VyIjp7ImlkIjoiMDE5NGM5MWQtMDQzYS03zODkzOTM3MiwiZXhwIjo0MzMwOTM5MzcyfQ.jVH3un6CBQ62aD_eXIwghoaQ6ak4ZnYfLgz6uDuZbrM",
      "user": {
        "id": "0194c91d-043a-7ad6-a697-26cbaeb12a25",
        "name": "administrator"
      }
    }
  }
}
Mutations
This section explains how to use interactive GraphQL to make changes to the database.
NOTE: For all mutations, make sure the Headers section at the bottom of the page has the Authorization Bearer type method. Use the authenticationToken received during login step above. We use that value received previously in this example.
{
  "Authorization": "Bearer YWQ2LWE2OTctMjZjYmFlYjEyYTI1In0sImlhdCI6MTceyJhbGciOiJIUzI1NiIsInR5cCI6IkpXVCJ9.eyJ1c2VyIjp7ImlkIjoiMDE5NGM5MWQtMDQzYS03zODkzOTM3MiwiZXhwIjo0MzMwOTM5MzcyfQ.jVH3un6CBQ62aD_eXIwghoaQ6ak4ZnYfLgz6uDuZbrM"
}
Promote a Registered User to an Administrator
Use the following GraphQL mutation to assign administrator role to user:
mutation {
  updateUser(input: { id: "user-id", role: administrator }) {
    id
    name
  }
}
Creating Organizations
Use the following GraphQL mutation to create an organization:
mutation {
  createOrganization(
    input: {
      addressLine1: "Los Angeles"
      addressLine2: "USA"
      city: "Los Angeles"
      countryCode: in
      description: "testing"
      name: "Test Org 7"
      postalCode: "876876"
      state: "California"
    }
  ) {
    id
  }
}
Example Response:
{
  "data": {
    "createOrganization": {
      "id": "0194e104-31df-7906-a221-90d80ff27582"
    }
  }
}
Create an Organization Member
This mutation is used to add a member to an organization and assign them a role.
- Administrators can add other users and assign roles (administrator or regular).
- Non-administrators can only add themselves to an organization.
- Non-administrators cannot assign roles while adding themselves; they will be assigned the default role (regular).
The example below shows how to add an administrator to an organization:
mutation {
  createOrganizationMembership(
    input: {
      memberId: "user-id"
      organizationId: "org-id"
      role: administrator
    }
  ) {
    id
    name
    addressLine1
    createdAt
    members(first: 5) {
      pageInfo {
        hasNextPage
        startCursor
      }
      edges {
        cursor
        node {
          id
          name
        }
      }
    }
  }
}
Queries
This section explains how to use interactive GraphQL to query the database.
Query Organization Data
Use the following GraphQL query to query organization data:
{
  organization(input: { id: "0194e11a-1d2f-7425-b447-84e641687570" }) {
    id
    name
    description
    addressLine1
    addressLine2
    city
    postalCode
    state
    countryCode
  }
}
Example Response:
{
  "data": {
    "organization": {
      "id": "0194e11a-1d2f-7425-b447-84e641687570",
      "name": "Test Org 27",
      "description": "testing",
      "addressLine1": "Los Angeles",
      "addressLine2": "USA",
      "city": "Los Angeles",
      "postalCode": "876876",
      "state": "California",
      "countryCode": "in"
    }
  }
}
Query User Data with Organizations
Use the following GraphQL query to query user data including a list of organizations the user is a member of:
query {
  user(input: { id: "user-id" }) {
    name
    emailAddress
    organizationsWhereMember(first: 5, after: null, before: null, last: null) {
      edges {
        node {
          id
          name
        }
      }
    }
  }
}
Request Headers:
Content-Type: application/jsonAuthorization: Bearer <your_token>
Example Response:
{
  "data": {
    "user": {
      "name": "administrator",
      "emailAddress": "administrator@email.com",
      "organizationsWhereMember": {
        "edges": [
          {
            "node": {
              "id": "019527e1-2f4a-7a89-94b6-193a3e9dfd76",
              "name": "Test Org 7"
            }
          },
          {
            "node": {
              "id": "cd3e4f5b-6a7c-8d9e-0f1a-2b3c4d5e6f7a",
              "name": "Unity Foundation 3"
            }
          },
          {
            "node": {
              "id": "bc2d3e4f-5a6b-7c8d-9e0f-1a2b3c4d5e6f",
              "name": "Unity Foundation 4"
            }
          },
          {
            "node": {
              "id": "ab1c2d3e-4f5b-6a7c-8d9e-0f1a2b3c4d5f",
              "name": "Unity Foundation 2"
            }
          },
          {
            "node": {
              "id": "ab1c2d3e-4f5b-6a7c-8d9e-0f1a2b3c4d5e",
              "name": "Unity Foundation 1"
            }
          }
        ]
      }
    }
  }
}
Database Management
This section covers easy ways for developers to validate their work by examining the database.
We use CloudBeaver which is a lightweight web application designed for comprehensive data management. It allows you to work with various data sources, including SQL, NoSQL, and cloud databases, all through a single secure cloud solution accessible via a browser.
Interactive Production DB Access
-
Open your preferred browser and navigate to:
http://127.0.0.1:8978/ -
Log in to the CloudBeaver UI using the following credentials (these credentials can be modified in the
.env.devcontainerfile by changing theCLOUDBEAVER_ADMIN_NAMEandCLOUDBEAVER_ADMIN_PASSWORDvariables):Username: talawaPassword: password -
You should now see the CloudBeaver UI. Click on the "New Connection" button and select
PostgreSQLfrom the list of available connections. -
Fill in the connection details as follows:
Name: talawaHost: postgresPort: 5432Database: talawaUsername: talawaPassword: password- Note: The host name should match the one specified in the Docker Compose file and credentials should match those specified in the
.env.developmentfile.
- Note: The host name should match the one specified in the Docker Compose file and credentials should match those specified in the
-
Check the
Save credentials for all users with accessoption to avoid entering the credentials each time. -
Check the following boxes in the Database list:
show all databasesshow template databasesshow unavailable databasesshow database statistics -
Click
Createto save the connection. -
You should now see the
PostgreSql@postgresconnection in the list of available connections. Click on the connection to open the database. -
Navigate to
PostgreSql@postgres > Databases > talawa > Schemas > public > Tablesto view the available schemas.
Interactive Test DB Access
-
Click on the
New Connectionbutton and selectPostgreSQLfrom the list of available connections. -
Fill in the connection details as follows:
Name: talawaHost: postgrestestPort: 5432Database: talawaUsername: talawaPassword: password- Note: The host name should match the one specified in the Docker Compose file and credentials should match those specified in the
.env.developmentfile.
- Note: The host name should match the one specified in the Docker Compose file and credentials should match those specified in the
-
Check the
Save credentials for all users with accessoption to avoid entering the credentials each time. -
Check the following boxes in the Database list:
show all databasesshow template databasesshow unavailable databasesshow database statistics -
Click
Createto save the connection. -
You should now see the
PostgreSql@postgres-testconnection in the list of available connections. Click on the connection to open the database. -
Navigate to
PostgreSql@postgres-test > Databases > talawa > Schemas > public > Tablesto view the available tables.
Modifying Tables (CLI)
To modify the database schema, you can add new tables or update existing ones within the src/drizzle/tables directory.Make sure containers are running and Follow the steps below to apply the changes properly:
1. Remove Old Tables
docker exec -it talawa-postgres-1 psql -U talawa -d talawa -c "
DO \$\$
DECLARE
    r RECORD;
BEGIN
    FOR r IN (SELECT tablename FROM pg_tables WHERE schemaname = 'public')
    LOOP
        EXECUTE 'DROP TABLE IF EXISTS ' || quote_ident(r.tablename) || ' CASCADE';
    END LOOP;
END \$\$;"
2. Remove Old Schema
  docker exec -it talawa-postgres-1 psql -U talawa -d talawa -c "
  DROP SCHEMA IF EXISTS drizzle CASCADE;
  DROP TYPE IF EXISTS exception_type CASCADE;
  DROP TYPE IF EXISTS frequency CASCADE;"
3. Remove Old Drizzle Migrations
docker exec -it talawa-api-1 /bin/bash -c 'pnpm drop_drizzle_migrations'
4. Generate New Drizzle Migrations
docker exec -it talawa-api-1 /bin/bash -c 'pnpm generate_drizzle_migrations'
5. Apply Migrations to the Database
docker exec -it talawa-api-1 /bin/bash -c 'pnpm apply_drizzle_migrations'
6. Validation (Access Updated Tables)
docker restart talawa-cloudbeaver-1
Note: Migrations are applied to postgres-test-1 while running tests for first time, to Re-run tests with updated tables, follow same steps for postgres-test-1.
Object Storage Management
We use MinIO, a free, open-source object storage server that's compatible with Amazon S3. It's designed for large-scale data storage and can run on-premises or in the cloud.
MinIO Access in Production
This is how you access MinIO in production environments.
- Open your preferred browser and navigate to:
http://127.0.0.1:9001/
- Log in to the MinIO UI using the following credentials(these credentials can be modified in the env files by changing the
MINIO_ROOT_USERandMINIO_ROOT_PASSWORDvariables):- Username:
talawa - Password:
password
- Username:
- You should now see the MinIO UI. Click on the
Loginbutton to access the MinIO dashboard. - You can now view the available buckets and objects in the MinIO dashboard.
MinIO Access in Development
This is how you access MinIO in development environments.
- Open your preferred browser and navigate to:
http://127.0.0.1:9003/
- Log in to the MinIO UI using the following credentials(these credentials can be modified in the
.env.devcontainerfile by changing theMINIO_ROOT_USERandMINIO_ROOT_PASSWORDvariables):- Username:
talawa - Password:
password
- Username:
- You should now see the MinIO UI. Click on the
Loginbutton to access the MinIO dashboard. - You can now view the available buckets and objects in the MinIO dashboard.
Resetting Docker
NOTE: This applies only to Talawa API developers.
Sometimes you may want to start all over again from scratch. These steps will reset your development docker environment.
- From the repository's root directory, use this command to shutdown the dev container.
docker compose down
- WARNING: These commands will stop ALL your Docker processes and delete their volumes. This applies not only to the Talawa API instances, but everything. Use with extreme caution.
docker stop $(docker ps -q)docker rm $(docker ps -a -q)docker rmi $(docker images -q)docker volume prune -f
- Restart the Docker dev containers to resume your development work.
devcontainer up --workspace-folder . --config .devcontainer/default/devcontainer.jsondocker exec talawa-api-1 /bin/bash -c 'pnpm run start_development_server'
Now you can resume your development work.
Mock Isolation & Cleanup
To ensure reliable test execution, especially in parallel environments, it is critical to properly isolate mocks in your tests.
The Rule
If you use vi.mock(), vi.fn(), or vi.spyOn() in a test file, you MUST include a cleanup hook to reset the mocks after each test.
How to Implement
Add the following afterEach hook to your test file:
import { afterEach, vi } from "vitest";

afterEach(() => {
  vi.clearAllMocks();
});
Choosing the Right Cleanup Method
Vitest provides several cleanup methods. Here's when to use each:
| Method | What It Does | When to Use |
|---|---|---|
vi.clearAllMocks() | Clears call history and results | Recommended default - Resets mock state while preserving implementation |
vi.resetAllMocks() | Clears history + resets implementation to vi.fn() | When you need to remove custom mock implementations |
vi.restoreAllMocks() | Clears history + restores original implementation | Only for vi.spyOn() - restores the real function |
vi.resetModules() | Clears module cache | When module-level state causes issues (rare) |
Best Practice: Use vi.clearAllMocks() in most cases. It's the safest option that works for all mock types.
Why?
Without this cleanup, mocks from one test can leak into others, causing:
- Flaky tests that fail randomly
- "Spooky action at a distance" where a change in one file breaks an unrelated test
- Failures when running tests in parallel (sharding)
Verification
We have a script that verifies this rule. You can run it locally:
npm run check_mock_isolation
To automatically fix violations:
npm run check_mock_isolation -- --fix
Environment Variables
MOCK_ISOLATION_FAIL_ON_ERROR
Controls whether the check fails the build or just warns:
true- Exits with code 1 if violations are found (fails CI)falseor unset - Exits with code 0 with warnings (default)
Example:
MOCK_ISOLATION_FAIL_ON_ERROR=true npm run check_mock_isolation
Troubleshooting
"No problems found" but tests still fail in parallel
Check for:
- Global state mutations outside of mocks
- Database fixtures not properly isolated
- Shared test data between files
"Module mocks not being reset"
Use vi.resetModules() in addition to vi.clearAllMocks():
afterEach(() => {
  vi.clearAllMocks();
  vi.resetModules();
});
"Spy on original implementation still called"
You're likely using vi.spyOn(). Use vi.restoreAllMocks() instead:
afterEach(() => {
  vi.restoreAllMocks();
});